It's card sketch week over at sketch support ... and it's all about hearts, lots and lots of hearts! Please, pleeeese, head over to sketch support and have a look at what the creative team has done with this!
http://www.sketchsupport.com/2012/02/card-week-part-4.html
I made a special layout featuring my husband! And for anyone who wants to know how I made my accordian hearts, stick around!
So, here's the sketch ...
Card Sketch #16
And here's my take on it ...
"MAN, Ohhh Man" by Michele Edwards
Supplies -
Cardstock: Bazzill;
Patterned Paper: Basic Grey and Fancy Pants;
Embellishments: Bling by Basic Grey;
Alphabets: Cricut (Plantin Schoolbook and Calligraphy Collection);
Floss: DMC.
My husband and I celebrated our 20th year together last week and I wanted to make a layout just for him! I love how this turned out.
Grid Variations
1. Instead of a card, I made a two-page layout.
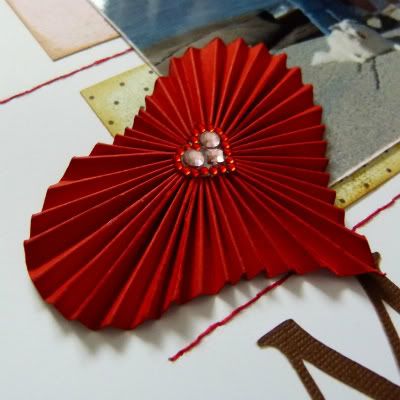
2. I made a grid with nine squares on the right page and filled each grid with square of paper and either a heart shaped photo or an accordian heart with a bling center.
I made the accordian hearts while at a crop at my favorite scrapbook store. I sat next to an extremely talented designer, Shelby, who said that I'd better be ready to explain how I made them. She's so good for my confidence! I am still a little surprised ... I'd like to thank everyone for their very kind comments.
So, without further ado, a very quick lesson.
Really, all you need is a template. I cut a strip of paper ~1.5" by 12" and folded it length-wise. Then I used my template and marked my heart ... the fold will be the bottom tip. Then I cut along the curvy line.
The rest is pretty much the same as an accordian flower. I used a score-pal, but you don't need to ... I scored the paper every 1/4" along it's length.
Then I folded it in the classic accordian style. I think you can see where this is going!
I glued the two ends together ... let it dry thoughly, this is the weakest link and if you don't glue it well and let it dry, it'll pop open later. While it's drying you'll need some waste paper, round pop-dots and Glossy Accents. I cut a circle with my waste paper and adhered a pop-dot in the center. Believe me, it's easier to have the pop-dot, it helps maintain the shape of the heart for the next step.
Now, practice ... place your accordian over the pop-dot and gently push the center together until all the folds touch the pop-dot in the center. Once you have a feel for it, remove the accordian and squeeze a thick band of Glossy Accents around the circle about mid-way between the pop-dot and the edge of the circle. You could use glue, but glue takes longer to dry. Again, gently position the heart around the pop-dot (and onto the bead of Glossy Accents) and hold until dry (yeah, that's the fun part!) If you are using Glossy Accents it does not take more than a few minutes. The picture on the left shows the glued / dryed heart. Finally, adhere some bling or a button, or whatever makes you happy ... cause you're DONE.
I realized (now) that I've gone on and on ... but I made a lot of mess before I got the first one finished. If you can improve on this, I'd love to hear about it.
Finally, the big red heart on my layout was made with cardstock. A word here ... DON'T do that, it's just too thick and it's a real battle to glue together. For that, I used a scrap paper almost as big as the heart ... and lots of Glossy Accents.
Enjoy!
.jpg)


.jpg)


.jpg)


