Saturday, March 24, 2012

Add-on Sketch Week

This week, the add on sketch was little flags ... I've only used them once before, but I knew instantly what I would do with them ... so here's the sketch ...

Add-on Sketch #15


And this is my layout ...

"Super Natural - Moraine Lake" by Michele Edwards
Supplies - Cardstock: Bazzill; Patterned paper: Basic Grey; Embellishments: Recollections (Brads); Ribbon: unknown; Alphabets: Cricut (Plantin Schoolbook and Calligraphy Collection); Markers: Copic; Floss: DMC; Sketch: Scrapbook Generation

I love this picture! I started with two-page sketch #25 and combined all the smaller photos into one breathtaking picture.

Variations

1. Instead of flags, I created sign posts to embellish this incredible two page picture of Moraine Lake (located in Banff National Park, Canada)


2. I enlarged the add-on to compliment the picture.

3. Using green floss and some white glue, I made grass to help ground the sign post.

This layout has some history.  I had originally planned to submit it for two-page sketch #25 ... but I wasn't happy with the picture ... I had it printed at Walmart, and the beautiful colour of Moraine Lake was subdued, muted, the mountains grey and flat.  I hated it.  Moraine Lake is one of the most beautiful places I have ever been ... the picture HAD to be perfect ... so the layout stalled.  And then, my husband suprised me with a new photo printer.  This was the first enlargement I printed ... the difference was night and day!  This picture is gorgeous.  When I saw the add-on sketch, well, I knew it would work for this layout!  I kept everything simple so that the picture would really pop!

Sunday, March 18, 2012

Two-Page Sketch Week

Last week was two-page sketch week over at Sketch Support.  I loved this sketch, and I love it even more after seeing what the rest of the creative team came up with ... I can hardly wait to use it again!  Head on over and see the beautiful and inspiring layouts http://www.sketchsupport.com/2012/03/two-page-week-part-4.html

Lynette posted 2 gorgeous layouts, and once again Carolyn created the absolute most beautiful layout yet, but then I always love her stuff.  Anyway, here's mine, but first the sketch.

Two-page Sketch #26


It's so great, right?  And here's my layout ...


"On the Pup Deck" by Michele Edwards
Supplies - Cardstock: Bazzill; Patterned paper: Authentique, Bella Blvd; Embellishments: Jolees (seagull, trees and pawprints), Kaisercraft (ticket), Susan Branch (mayflies); Alphabets: Cricut (Plantin Schoolbook); Floss: DMC; Beads: unknown

This is such an incredible sketch, I'll use it again and again. These pictures were taken from the deck of the HMS Chicheemaun as we crossed beautiful Georgian Bay.  Dogs were only permitted in this area, other than in vehicles locked in the parking deck.  No way were we leaving Ruff and Gem alone below deck, so we joined the other dog lovers, and their dogs on the "PUP DECK".

This layout is so me ... I loved that I could easily incorporate the panaramic picture of Georgian Bay, what an impact!

Variations

1. In this layout I stayed true to basic sketch, but combined all the photos across the middle of the layout into one long panoramic picture of Georgian Bay.

2. I used 3X4" photos in place of some of the rectangles across the top.

3. I stitched a double wave across the middle of the layout. I inserted blue glass beads randomly across the page to add sparkle to the waves.

4. I moved the title into one of the 3X4" rectangles.


Stop back next week, cause I'm in love with the next layout ...

Sunday, March 11, 2012

Card Sketch Week

Wow, it feels like weeks since I posted a layout.  Last week was card sketch week and the sketch had so many possibilities!  I did a two page layout, again, but this time I wanted to try something just a little outside my comfort zone.

Sooooo, here's the sketch.

Card Sketch #17


And here is what I did with it ...

"Hello Teddy" by Michele EdwardsSupplies - Cardstock: Bazzill; Patterned paper: We R Memory Keepers; Embellishments: Recollections (small star brads), Jolees (pawprints), Velvet ribbon (unknown), bone paper clip (unknown); Alphabets: Cricut (Plantin Schoolbook); Ink: Tim Holz; Floss: DMC; Twine; American Crafts.

The boys finally got their dog, a pudgy cocker spaniel! They named him Teddy!

Variations

1. I created a two-page layout rather than a card.

2. I flipped the sketch 90 degrees. The square photo of the boys replaced the square sentiment on the card.

There's something about this layout .. it looks so simple ... and too busy, all at the same time.  I tried to let the paper "be" the white space.  I'm just not sure about it, I look at it ... and sometimes I love it, and other times, well ... not so much.

I'm back in my comfort zone for the next one ...

To Blog or not To Blog

It has been a long time ... so much happening.  So, first I was sick ... really sick, nassssty sick.  And after that, well crazy busy.  I'm certainly NOT relaxing, again.

My car was broken into AGAIN!  I don't drive a snazzy car, I drive a Cavalier ... basic car, no a/c, no CD player.  So why is my car targeted?  These guys piss me off ... everytime they break my window it costs me $300 to get it fixed.  This time they actually stole something ... an extention cord.  Yep, my extention cord that I use to plug in my block heater.  Assholes!

Three months ago my little HP Photoprinter stopped working.  Cartridge jam ... according to what I see on the web, it's fairly common ... but either impossible or too expensive to fix.  So I've been printing my photos at Walmart.  The quality sucks ... really sucks.  To be fair, it's not their fault, it's the instruments fault.  I can't stand it when the beautiful, vibrant colours in my photos are muted during printing.  Well, I got a big surprise ... a new printer!  My husband got me a Canon Pro9000, and holy cow! what a difference.  My pictures are sensational, incredible ... beautiful!

This printer is big, it has to be ... it can print enlargements up to 13" X 19" ... that's HUGE!  So we went out looking for a nice solid printer stand.  It was hopeless.  We ended up putting one of our existing bookcases on it side (it still works as a bookcase that way too) ... it works really well, but I needed another bookcase, right?  Soooooo, off to IKEA.  I love IKEA.  Nice-looking and functional stuff, it won't break the bank, and I won't get mad at the dogs when they scratch it ... cause they will!  I already have some Billy's in the office ... but now they have nice deep units, perfect for all my scrapbooking stuff, so I got two!

So, while I'm hauling all my paper out, moving the office around and then organizing all my scrapbooking stuff, it hits me ... I've got alot of stuff!  Yikes!  Quick-like I check the specs on these new Billy's.  Whew, each shelf can hold 93lbs ... I think I'm OK.  All my albums, totes, well, everything fits ... I'm really happy with these new bookcases!

And ... spring is here ... not officially, but you can feel it in the air, hear the birds singing, feel it, you know?  Listen to me, I never had to wear my parka this winter ... or even my boots.  But I can't help but feel excited that spring is here.  Today, I'm planting some veggy seeds for my garden ...

Friday, February 17, 2012

Add-on Sketch Week

TGIF!  I am SO looking forward to this weekend ... this long weekend.  Hurray for Family Day!

My project for the Feb Add-on Sketch went up today ... http://www.sketchsupport.com/2012/02/add-on-week-part-5.html

So, here's the sketch ...

Add-on Sketch #14


And here is what I did with it ...

"Garden Beauty" by Michele Edwards
Supplies - Cardstock: American Crafts, Bazzill; Patterned paper: Jillibean, ProvoCraft; Embellishments: Recollections (small sunflowers), Jolees (ladybug and ant stickers); Alphabets: Cricut (Plantin Schoolbook and Calligraphy Collection); Ink: Tim Holz; Floss: DMC; Sketch: Scrapbook Generation

Every year it happens, the winter blues. I long for the bright sunny days, and for my garden. I confess that I've spend hours looking at the online seed catalogues, planning my next garden!

Variations

1. I used the add-on to embellish a two-page layout.

2. Instead of hearts, I created stems with leaves and flowers. I made an accordian sun-flower, and re-created the swirl in the seeds using string.


Thanks for looking!  Enjoy your weekend!

Saturday, February 11, 2012

Two-Page Sketch Week

I'm a little late posting this week, another crazy week.

My layout went up on Sketch Support on Tuesday, but I've not had a chance to post it myself.  I barely got my next project into Allison before the deadline!

Here it is, Two-Page Sketch #25.


Oh, I love this sketch!  I had all kinds of great ideas.  I was going to combine the photoblock into one giant picture ... and I even printed that picture, and then cut it wrong.  I didn't have the time to deal with it.  So I ended up with just this one ... which is so very cute!  These pictures were taken during the early part of March 2011 when Alfie was still the new guy!


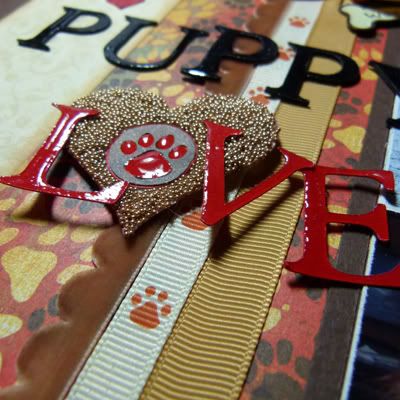
"Puppy Love" by Michele Edwards
Supplies - Cardstock: Bazzill, Bo Bunny; Patterned Paper: Basic Grey; Embellishments: Micro Beads from DeSerres, Paw prints are Jolees; Ribbon: KaiserCraft; Alphabets: Cricut (Plantin Schoolbook); Floss: DMC; Misc: Glossy Accents

Variations

1. I loved the photo sizes in the sketch, and so didn't change them, I simply rearranged a few of them. I matted the entire photo block.

2. I used ribbon for the vertical paper strips on the left side of the page. I tied a cute little bow near the top.

3. I wanted the title to appear wet, like the letters were just lavished with puppy kisses, so I coated them with Glossy Accents.


I used the microbead encrusted heart as the 'O' in the word LOVE, and floated the letters over the layout.

4. I removed the journaling strips.

5. Instead of flower embellishments on the right page, I stitched a curvey line across the layout and then placed little paw prints along its length.

Enjoy!

Thursday, February 2, 2012

Sketch Support - Feb Card Sketch (and some extra info)

It's card sketch week over at sketch support ... and it's all about hearts, lots and lots of hearts!  Please, pleeeese, head over to sketch support and have a look at what the creative team has done with this!  http://www.sketchsupport.com/2012/02/card-week-part-4.html

I made a special layout featuring my husband!  And for anyone who wants to know how I made my accordian hearts, stick around!

So, here's the sketch ...

Card Sketch #16


And here's my take on it ...


"MAN, Ohhh Man" by Michele Edwards
Supplies - Cardstock: Bazzill; Patterned Paper: Basic Grey and Fancy Pants; Embellishments: Bling by Basic Grey; Alphabets: Cricut (Plantin Schoolbook and Calligraphy Collection); Floss: DMC.

My husband and I celebrated our 20th year together last week and I wanted to make a layout just for him! I love how this turned out.

Grid Variations

1. Instead of a card, I made a two-page layout.

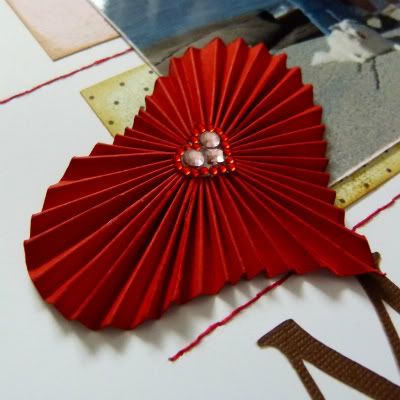
2. I made a grid with nine squares on the right page and filled each grid with square of paper and either a heart shaped photo or an accordian heart with a bling center.


I made the accordian hearts while at a crop at my favorite scrapbook store.  I sat next to an extremely talented designer, Shelby, who said that I'd better be ready to explain how I made them.  She's so good for my confidence!  I am still a little surprised ... I'd like to thank everyone for their very kind comments.

So, without further ado, a very quick lesson.

Really, all you need is a template.  I cut a strip of paper ~1.5" by 12" and folded it length-wise.  Then I used my template and marked my heart ... the fold will be the bottom tip.  Then I cut along the curvy line.


The rest is pretty much the same as an accordian flower.  I used a score-pal, but you don't need to ... I scored the paper every 1/4" along it's length.


Then I folded it in the classic accordian style.  I think you can see where this is going!


I glued the two ends together ... let it dry thoughly, this is the weakest link and if you don't glue it well and let it dry, it'll pop open later.  While it's drying you'll need some waste paper, round pop-dots and Glossy Accents.  I cut a circle with my waste paper and adhered a pop-dot in the center.  Believe me, it's easier to have the pop-dot, it helps maintain the shape of the heart for the next step.


Now, practice ... place your accordian over the pop-dot and gently push the center together until all the folds touch the pop-dot in the center.  Once you have a feel for it, remove the accordian and squeeze a thick band of Glossy Accents around the circle about mid-way between the pop-dot and the edge of the circle.  You could use glue, but glue takes longer to dry.  Again, gently position the heart around the pop-dot (and onto the bead of Glossy Accents) and hold until dry (yeah, that's the fun part!)  If you are using Glossy Accents it does not take more than a few minutes.  The picture on the left shows the glued / dryed heart.  Finally, adhere some bling or a button, or whatever makes you happy ... cause you're DONE.


I realized (now) that I've gone on and on ... but I made a lot of mess before I got the first one finished.  If you can improve on this, I'd love to hear about it.

Finally, the big red heart on my layout was made with cardstock.  A word here ... DON'T do that, it's just too thick and it's a real battle to glue together.  For that, I used a scrap paper almost as big as the heart ... and lots of Glossy Accents.

Enjoy!